A full table of commercial wargaming terrain can easily cost $300–500 AUD — and that’s before you’ve bought a single miniature. But if you own a 3D printer, you can build an entire battlefield for the price of a few spools of filament. 3D printing wargaming terrain has quietly become one of the hobby’s worst-kept secrets, and this guide covers everything: FDM vs resin, the best settings, where to find files, and how to paint it all to tabletop standard.
Whether you’re building ruins for Warhammer 40K, dungeons for D&D, or Wild West towns for historical games, the principles are the same. Let’s build your battlefield.
Why Is 3D Printing Wargaming Terrain So Popular?
The maths is brutal. A single Games Workshop Sector Imperialis ruin set retails for a painful amount in Australia, and you need four to six pieces for a decent table. A 1kg spool of PLA ($25–35 AUD) prints roughly 8–12 medium terrain pieces. That’s an entire table’s worth of terrain for under $70 in filament — versus hundreds for commercial kits.
Beyond cost, 3D printing wargaming terrain gives you variety and scale control. Need a ruin that’s exactly 12 inches long to fit a scenario? Scale it in the slicer. Want a matching set of six identical buildings? Print six. Commercial terrain can’t touch that flexibility.
FDM vs Resin for 3D Printing Wargaming Terrain
This is the first decision, and the answer is clear: FDM wins for terrain, resin wins for miniatures. Here’s why:
- Size: Terrain is big. A ruined building can be 200mm+ in every dimension — trivial for an FDM printer, impossible on most resin printers without splitting into many pieces.
- Cost: FDM filament is $25–40/kg; resin is $40–70/kg and you use more of it on bulky pieces.
- Detail needs: Terrain is viewed from 3+ feet away. You don’t need 0.05mm layers on a ruined wall — 0.2mm looks perfect once painted.
- Durability: Terrain gets handled, knocked over, and transported. PLA/PETG survives; standard resin is brittle.
Resin has its place — small scatter terrain, detailed statues, and dungeon dressing at 28mm scale all benefit from resin’s crispness. But for the big stuff, FDM is faster, cheaper, and tougher. If you’re choosing your first printer partly for wargaming, our Australian printer buying guide will help.
Scale: Getting It Right
Scale confusion ruins more terrain projects than bad settings. The common wargaming scales:
- 28mm “heroic” (Warhammer 40K, Age of Sigmar): figures ~32mm tall. Buildings should have doorways ~40mm tall and floors ~70–80mm apart. Print at 100% of files labelled “28mm”.
- 28mm “true scale” (Bolt Action, historicals): slightly smaller; 28mm files usually work fine.
- 32mm (many board games, some skirmish games): scale 28mm files to ~114%.
- 15mm / 10mm / 6mm (Flames of War, Epic): terrain prints fast and cheap at these scales — a whole table in a weekend.
Pro tip: print one test doorway or wall section first and stand a miniature next to it before committing to a 20-hour building print. Five minutes of checking saves a failed centrepiece.
Best Settings for Terrain Prints
Terrain is forgiving — which means you can print fast:
- Layer height: 0.2–0.28mm. At tabletop viewing distance, 0.28mm looks identical to 0.12mm once painted. Save the fine layers for miniatures.
- Walls: 2–3 walls. Terrain gets knocked around; 3 walls with 10–15% infill is tougher than 2 walls with 30% infill.
- Infill: 10–15% gyroid or lightning infill. Terrain is mostly hollow shells — infill just needs to support roofs.
- Supports: Design-dependent. The best terrain files are designed support-free with 45° angles. Avoid files that need heavy supports — they waste filament and time.
- Speed: Push it. 80–100 mm/s is fine for terrain on a modern printer; nobody will notice slightly rougher surfaces under paint and drybrushing.
A medium ruin (150mm tall) at these settings takes 8–14 hours and uses 150–250g of filament. Start it before bed, wake up to a building.
Where to Find Terrain STL Files
The community behind 3D printing wargaming terrain has produced staggering amounts of free and paid terrain:
- Printables & Thingiverse: Thousands of free terrain files. Search “28mm ruin” or “wargaming building” and sort by makes/downloads.
- Printable Scenery: The gold standard paid terrain designer — their “Rampage” gothic ruins and “Clorehaven” fantasy town are legendary. Worth every cent.
- Terrain4Print: Excellent free and paid sets with a distinctive style.
- Patreon creators: Many terrain designers run Patreons ($10–15/month) with monthly releases — incredible value if you’re building a full table.
Check licenses before printing for clubs or events — most personal-use licenses are fine for your own table, but selling prints or using them commercially needs the right license. Our pricing guide for 3D printed products covers the commercial side.
Terrain Types Worth Printing
Ruins and Damaged Buildings
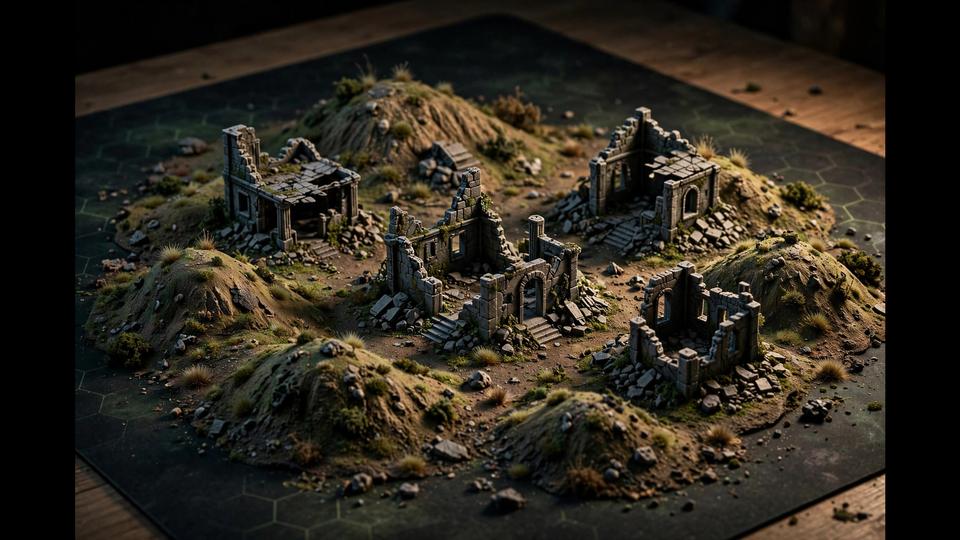
The backbone of any 40K or post-apocalyptic table. Look for sets with modular wall sections so you can build different layouts. Print 4–6 medium ruins for a standard 6’×4′ table.
Hills, Rocks, and Natural Features
Low-poly rock formations and hills print beautifully with zero supports and look great with a heavy drybrush. Stackable hill tiers let you create multi-level battlefields.
Scatter Terrain
Barrels, crates, barricades, sandbags, ammo boxes — the small stuff that makes a table feel alive. These are fast prints (1–3 hours) and perfect for using up the last 50g on a spool.
Bases and Gaming Aids
Objective markers, wound counters, dice trays, card holders, and movement trays. Functional prints that see use every single game. A printed organizer for your tokens and dice is just as useful off the table.
Painting Printed Terrain to Tabletop Standard
Here’s the secret the pros know: terrain is the easiest thing in the hobby to paint well. The techniques are simple and forgiving:
- Prime: Automotive filler primer from Supercheap Auto ($15) fills layer lines beautifully. Two light coats.
- Base coat: Cheap craft acrylics or spray cans. Don’t use expensive miniature paints on terrain — you’ll go broke.
- Wash: A dark wash (homemade from paint + water + dish soap) sinks into recesses and adds instant depth.
- Drybrush: The magic step. Load a big brush, wipe most paint off, and drag across surfaces. Highlights pop, details emerge, layer lines vanish.
- Flock/static grass: PVA glue + flock on bases grounds the piece visually.
Total painting time per medium piece: 1–2 hours. Total cost in paint: a few dollars. The drybrush step alone makes prints look 10× better — layer lines that were obvious in grey plastic disappear under texture.
Transporting and Storing Printed Terrain
Printed terrain is light but bulky. Stackable designs help; so do stackable storage tubs from Bunnings. For club nights, a 60L tub holds a surprising amount of PLA terrain. Add foam offcuts between pieces if you’re precious about paint jobs — though honestly, a few paint chips just add “battle damage” character.
Designing Your Own Terrain
Once you’ve printed enough downloaded terrain, you’ll want custom pieces — a building that matches your army’s aesthetic, a crashed spaceship for that narrative campaign. You don’t need to be a 3D artist:
- Kitbashing: Combine parts from different free models in your slicer or Meshmixer. A ruin wall + a different roof + greebles from a third file = a “new” building.
- Tinkercad: Browser-based, free, and genuinely enough for blocky sci-fi structures. Ruins are boxes with chunks removed — Tinkercad’s hole objects do exactly this.
- Blender: Steeper learning curve, but the displace modifier on a subdivided cube creates natural rock formations in minutes. Add a decimate modifier to keep triangle counts printable.
Design for printing from the start: 45° overhangs max, flat bases, wall thickness above 1.2mm. A beautiful model that needs 12 hours of supports is a failed design for FDM terrain.
Magnetizing and Modularity
The advanced move: design pause points in your prints to insert magnets, creating terrain that snaps together in different configurations. A ruined building with magnetic wall sections becomes six buildings. Standard 6×3mm neodymium magnets press-fit into printed sockets work perfectly — just remember to check polarity before gluing.
Modular dungeon tile systems (like Dragonlock, with its free clip system) take this further: 3D printed tiles that lock together into any dungeon layout. A full Dragonlock set is a bigger print commitment than wargaming ruins, but the reusability is unmatched.
Planning a Full Table: The Shopping List
For a standard 6’×4′ Warhammer table, aim for:
- 4–6 large pieces (ruins, buildings) — the line-of-sight blockers
- 4–8 medium pieces (craters, small ruins, containers) — mid-table interest
- 10–15 scatter pieces (barrels, barricades, ammo crates) — texture and cover
- 6 objective markers — game-specific, but every game needs them
Total filament: roughly 3–4kg. Total print time: 150–250 hours of printer time (about 3–4 weeks of overnight printing). Total cost: under $150 AUD in filament. Compare that to commercial terrain and the printer has nearly paid for itself.
Taking It Further: Competition-Level Terrain Painting
Tabletop standard is achievable in an afternoon per piece. Competition standard takes longer but the techniques are learnable:
- Airbrushed gradients: Zenithal priming (white from above, black from below) before drybrushing creates realistic light falloff that hand-painting can’t match. Our budget airbrush guide covers affordable setups.
- Weathering powders: Pigment powders (rust, soot, dust) brushed into recesses and sealed with matte varnish add realism that paint alone can’t achieve. A $20 starter set lasts years.
- Water effects: Two-part epoxy resin poured into printed crater or river sections creates stunning water features. Tint with a drop of ink. Let it cure fully before handling.
- LED integration: Design pause points to insert LEDs — glowing windows, landing pads, lava cracks. Coin-cell holders printed into the base keep wiring simple. The effect on a dark gaming table is unforgettable.
None of this is required for great-looking tables — a well-drybrushed ruin beats a poorly-executed competition piece every time. But when you’re ready to push further, the ceiling is very high.
Terrain for Other Game Systems
While Warhammer dominates the conversation, printed terrain serves every tabletop game:
- D&D / Pathfinder: Dungeon tiles, tavern interiors, and wilderness scatter at 28mm. Printed dungeon tiles with magnetic connectors replace expensive Dwarven Forge sets at a tenth of the cost.
- Bolt Action / historicals: European buildings, hedgerows, and bridges. Historical accuracy matters to this crowd — reference photos beat generic ruins.
- Star Wars Legion / Shatterpoint: Sci-fi terrain with clean geometric designs prints beautifully and paints fast with airbrushed gradients.
- Blood Bowl / sports games: Dugouts, scoreboards, and stadium scatter. Small prints, big personality.
- Board game upgrades: Custom inserts, token organizers, and 3D terrain replacements for cardboard standees. The board game community on Printables is enormous.
A final thought: the best terrain table is the one that gets used. Don’t wait until you have a “complete” set — print three ruins and some scatter, invite a mate over, and play. The gaps in your collection will reveal themselves through actual games, and every subsequent print will be targeted at a real need rather than a hypothetical one. Terrain building is a journey, not a destination — enjoy the process. And once you’re 3D printing wargaming terrain regularly, you’ll never look at a $90 commercial ruin the same way again.
Frequently Asked Questions
Is it cheaper to 3D print wargaming terrain?
Dramatically. A full table of printed terrain costs $50–80 AUD in filament versus $300–500+ for commercial kits. The printer pays for itself in terrain alone if you’re building multiple tables.
FDM or resin for wargaming terrain?
FDM, without question, for anything larger than a barrel. Terrain is big, gets handled roughly, and is viewed from distance — FDM is cheaper, tougher, and faster at terrain scales. Use resin for miniatures and fine detail pieces.
What scale should I print terrain at?
Match your game: 28mm heroic for Warhammer (doorways ~40mm, floors ~75mm apart). Print a test piece and check against a miniature before committing to large prints.
How long does it take to print a terrain set?
A medium ruin takes 8–14 hours. A full 6’×4′ table’s worth (4–6 buildings plus scatter) is roughly a week of overnight prints. Scatter terrain pieces take 1–3 hours each.
Do I need supports for terrain?
The best terrain files are designed to print support-free with 45° angles. Avoid files requiring heavy supports — they waste time and filament. Check designer photos for clean undersides.
Into miniatures too? Our cosplay printing guide covers large detailed prints, and the budget airbrush guide will level up your paint jobs.