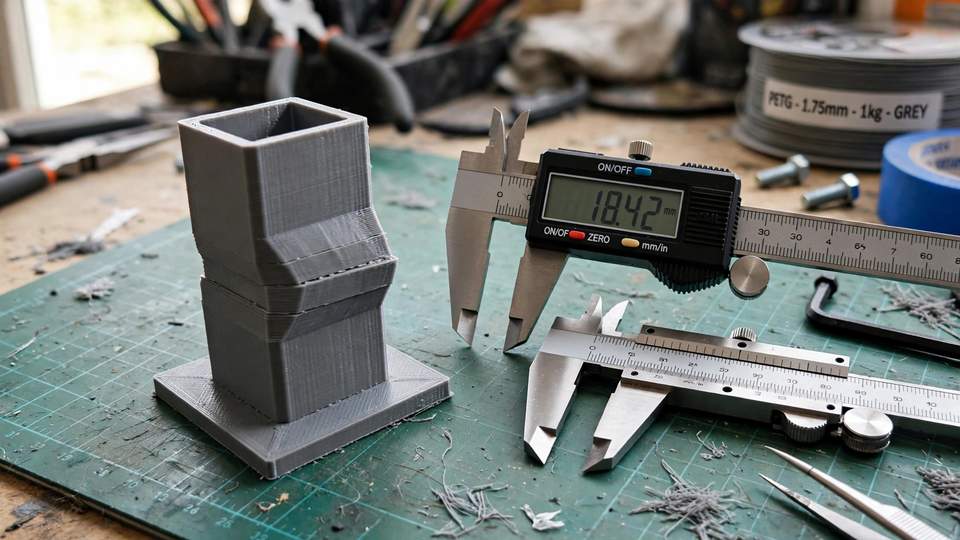
This 3d print layer shifting fix guide covers everything. You walk into the room expecting a perfect print and instead find something that looks like it slid sideways halfway through. That sharp, stepped offset in the layers is called layer shifting, and it is one of the most common — and most fixable — problems in FDM 3D printing. This 3D print layer shifting fix guide walks you through exactly what causes it, how to diagnose your printer, and the practical repairs that get you back to clean, accurate prints.
Layer shifting happens when one or more of your printer’s axes “loses” its position mid-print. The stepper motors think they are at position X, but the gantry or bed is actually a few millimetres to one side. Everything printed after that point is offset, and if the printer loses steps repeatedly, you end up with a staircase effect or a print that drifts further and further off course.
What Does Layer Shifting Look Like? (3D Print Layer Shifting Fix Guide)
Before you start pulling your printer apart, make sure you are actually dealing with a layer shift and not something else. A genuine layer shift has a few tell-tale signs:
- A clean, sharp offset — one section of the print is shifted sideways along the X or Y axis, with a distinct step you can feel with your fingernail.
- It happens at a specific height — the shift appears at one layer and everything above it follows the new position.
- Sometimes it shifts back — the print may jump sideways, then jump back later, leaving a zigzag profile.
- One axis is usually worse — most machines shift more on X (the moving hotend) or Y (the moving bed), depending on the design.
It is easy to confuse layer shifting with other defects. If the whole print looks slightly squished or the walls wobble, you are probably looking at ringing or ghosting, not shifting. If layers are separating and splitting apart, that is delamination — a temperature or cooling issue. Real layer shifts are abrupt and geometric: the print literally moves and keeps printing somewhere else.
Before diving into specific causes, know that this 3d print layer shifting fix approach works for any FDM printer, from budget Enders to premium Bambu Labs.
Cause #1: Loose Belts (The Most Common Culprit)
Nine times out of ten, when an Aussie maker’s print shifts layers, the answer is belt tension. Your X and Y axes are driven by toothed timing belts, and if they are too loose, the belt can skip a tooth on the motor pulley. Each skipped tooth is a lost couple of millimetres — and there is your shift.
How to Check Belt Tension
With the printer powered off, slide the hotend carriage and the bed by hand. The belt should feel taut like a guitar string — firm with just a little give. If you can see the belt sag, or if plucking it feels like plucking a wet noodle, it is too loose. Also listen while printing: a belt that is about to skip often makes a rhythmic clicking or thudding noise, especially on fast travel moves.
How to Tension Your Belts Properly
Most printers (including the Anycubic Kobra series, Creality Ender 3s and similar) tension the X belt with a screw at the end of the gantry and the Y belt with screws under the bed or at the front of the frame:
- Loosen the mounting screws on the belt tensioner, pull the tensioner until the belt is firm, then tighten the screws back down.
- Aim for a low-pitched twang when you pluck the belt — not a dull flap, and not a high-pitched guitar-string ping.
- Do not over-tighten. A belt that is too tight loads up the bearings and stepper motor, causing its own set of problems including premature wear and — ironically — missed steps from the extra resistance.
- After tensioning, manually move the axis through its full range and feel for rough spots or grinding.
If you print a lot, check belt tension every month or two. Belts stretch slightly with heat cycles and age, and a tensioner can work loose from vibration over time.
Cause #2: Stepper Driver Overheating
Your stepper motors are driven by small driver chips on the mainboard. When those drivers get too hot, they go into thermal protection and briefly shut down — the motor misses steps while the driver recovers. On a warm Aussie afternoon (or in a garage that hits 35°C in summer), this can absolutely cause layer shifts on prints that were fine in winter.
Signs of overheating drivers include:
- Shifts that only happen on long prints, especially in hot weather.
- The printer’s electronics enclosure feels very hot to the touch.
- Shifts that disappear if you aim a desk fan at the mainboard.
The fixes are straightforward. Make sure the mainboard cooling fan is actually spinning and not clogged with dust or filament strings. If your printer has adjustable stepper driver current (Vref), check that it matches the manufacturer’s spec — too much current makes drivers run hot, too little makes motors weak. If you run your printer in an enclosure for ABS or ASA, consider venting the electronics or moving the power supply and mainboard outside the enclosure. Electronics like it cool; your ABS does not care either way.
Cause #3: Print Speed and Acceleration Too High
Stepper motors have a torque limit. Ask them to change direction too violently — high print speeds combined with aggressive acceleration and jerk settings — and the motor simply cannot keep up. It skips steps, and the layer shifts. This is the classic 3d print layer shifting fix scenario for anyone who has cranked speeds up to try to finish a print before dinner.
As a rule of thumb for a typical bed-slinger or gantry machine:
- Keep print speeds at or below 60–80 mm/s for outer walls where quality matters.
- Travel moves (non-printing moves) are the usual trigger — try capping them around 120–150 mm/s rather than 200+.
- If your slicer lets you set acceleration, 500–1000 mm/s² is a safe range for most machines; going beyond 2000–3000 on a stock machine is asking for trouble.
- Enable “acceleration control” and “jerk control” in your slicer if you have been running firmware defaults that are too aggressive.
The test is simple: slice the same model at your current speeds and again at conservative speeds. If the slow version prints clean, speed was your problem. You can then nudge speeds back up gradually to find your machine’s real limit.
Cause #4: The Nozzle Is Colliding With the Print
Sometimes the printer is mechanically fine and the problem is the model itself. If the nozzle catches on curled-up edges, blobs, or tall thin features, the impact can knock the axis out of position. This is common with:
- Overhangs that curl upward — the nozzle ploughs into the raised edge on the next pass.
- Z-seam blobs or oozing — a blob of plastic becomes a speed bump.
- Tall, thin towers — the part wobbles and the nozzle clips it.
Enable Z-hop (also called Z-lift) in your slicer — a small 0.2–0.4 mm lift during travel moves keeps the nozzle clear of the print. Also check your cooling: inadequate part cooling lets overhangs curl, which creates the very obstacles the nozzle collides with. A better part-cooling duct or a modest fan-speed increase can break this cycle entirely.
Cause #5: Power Fluctuations and Electrical Gremlins
This one is underappreciated, especially in Australia where summer storms and dodgy rural power are a fact of life. A brief voltage dip — the lights flicker, the air conditioner kicks in — can starve the stepper drivers for a fraction of a second. The print head does not stop, but the motors lose their grip for a moment and you get a shift.
If your shifts happen at random heights, only during storms or hot days when the aircon cycles, suspect power. A small UPS (uninterruptible power supply) or even a decent surge-protection power board with voltage regulation can make the problem vanish. At minimum, avoid running your printer on the same circuit as power-hungry appliances like welders, big air compressors or ducted aircon units.
Cause #6: Mechanical Obstructions and Binding
Sometimes the axis physically cannot move freely. Check for:
- Filament or debris in the motion system — a stray bit of plastic wedged in a V-wheel or linear rail.
- Over-tightened eccentric nuts — V-wheels on aluminium extrusion need to be snug but still turn freely. If you have to force the carriage, they are too tight.
- Bent lead screws or misaligned Z-rods — usually shows as binding at specific heights, and the shift repeats at the same Z on every print.
- Cables snagging — a cable chain or loose wire loom catching on the frame at the extremes of travel.
With the printer off, move each axis slowly through its full range by hand. It should glide smoothly with even resistance. Any grinding, catching or tight spots need fixing before you touch a single slicer setting.
Step-by-Step: The 3D Print Layer Shifting Fix Diagnosis Workflow
Rather than changing everything at once, work through this methodically. Fix the free and easy stuff first.
Step 1: Inspect the Failed Print
Look at where the shift happened. Single clean shift on one axis? Probably belt or a single skipped step. Repeated zigzag shifts? Likely speed/acceleration or overheating. Random shifts at different heights across multiple prints? Power or mechanical obstruction.
Step 2: Check Belts and Pulleys
Tension belts as described above. While you are there, check that the grub screws on the motor pulleys are tight — a pulley spinning loosely on the motor shaft causes exactly the same symptom as a skipped belt tooth, and it is embarrassingly easy to miss. Use the short end of an Allen key and really snug them down.
Step 3: Slow It Down
Slice a test print (a simple 20 mm calibration cube or a small benchy) at conservative speeds: 50 mm/s print, 120 mm/s travel, modest acceleration. If it prints clean, your mechanics are fine and your old profile was simply too aggressive.
Step 4: Check Temperatures
Feel the mainboard enclosure after an hour of printing. Clean the electronics fan. If you suspect overheating, print with the enclosure door open or a fan pointed at the board as a test.
Step 5: Move Axes by Hand
Power off, move X, Y and Z through their full ranges. Fix any binding, tight wheels or snagging cables you find.
Step 6: Stabilise Power
If shifts correlate with weather or appliances, put the printer on a UPS or a regulated power board.
When It Is a Hardware Fault, Not Settings
Sometimes you do everything right and the shifts keep coming. That is when you start suspecting actual faulty hardware:
- A dying stepper motor — if one motor runs noticeably hotter than the others or makes unusual noises, swap it with another axis as a test. If the problem follows the motor, replace it.
- A failing stepper driver — on boards with removable drivers (like many BigTreeTech boards), swap two drivers and see if the shifting axis changes.
- A cracked or damaged belt — inspect the full length of the belt for fraying, missing teeth or cracks. Belts are cheap; replace rather than nurse along.
- A warped or damaged pulley — a pulley with a chipped tooth will cause a periodic shift at the same point in every print.
Replacement GT2 belts, pulleys and NEMA 17 stepper motors are inexpensive and widely available from Aussie suppliers like Jaycar or specialist 3D printing stores — there is no need to import from overseas and wait weeks. If your printer is still under warranty, contact the manufacturer before opening the electronics; a mainboard fault is their problem, not yours.
Prevention Checklist: Keep Layer Shifts Away for Good
Once you have fixed the immediate problem, a little routine maintenance stops it coming back:
- Check belt tension monthly — more often if you print daily.
- Keep the electronics fan and mainboard free of dust.
- Do not exceed your machine’s realistic speed limits; save the speed records for benchy races, not functional parts.
- Use Z-hop (0.2–0.4 mm) on prints with overhangs or delicate features.
- Keep firmware and slicer profiles sane — if you copy someone’s “ultra-fast” profile from the internet, verify the acceleration values suit your machine.
- Run the printer on clean, stable power — a UPS is cheap insurance in storm season.
- After any crash or nozzle collision, re-check belt tension and pulley grub screws before the next print.
Layer shifting looks dramatic, but it is almost always one of the handful of causes above — and nearly all of them are fixed with basic hand tools and ten minutes of your time. Work through the diagnosis in order, resist the urge to change five settings at once, and your printer will be back to stacking perfect layers. For more on dialling in print quality, see our guide to calibration cube tuning and where to buy quality filament in Australia — because even a perfectly tuned printer cannot overcome a bad spool.
For a second opinion with excellent photos of each failure mode, All3DP’s troubleshooting hub is worth a look: all3dp.com — 3D printer layer shifting causes and fixes.