There’s nothing quite like the heartbreak of checking on a print two hours in and finding the corners curled up off the bed like a potato chip. If you’ve been chasing a reliable 3d print warping fix, you’re not alone — it’s one of the most common problems in the hobby, and it hits Australian makers particularly hard. Between coastal humidity, hot garages in summer and cold draughty sheds in winter, AU printers cop conditions overseas guides rarely deal with.
The good news: warping is a physics problem, not a mystery. This guide covers why it happens, why Australian weather makes it worse, and the fixes that actually work — from free slicer tweaks to proper filament drying.
What Warping Actually Is (The Physics in Plain English)
Warping happens because plastic shrinks as it cools. Your printer lays down filament at 200-plus degrees; as each layer cools toward room temperature it contracts, while the layers below have already set. The top layers pull the corners inward and upward — and the longer the part, the more leverage that shrinkage has, which is why a 150 mm panel warps and a 20 mm cube doesn’t.
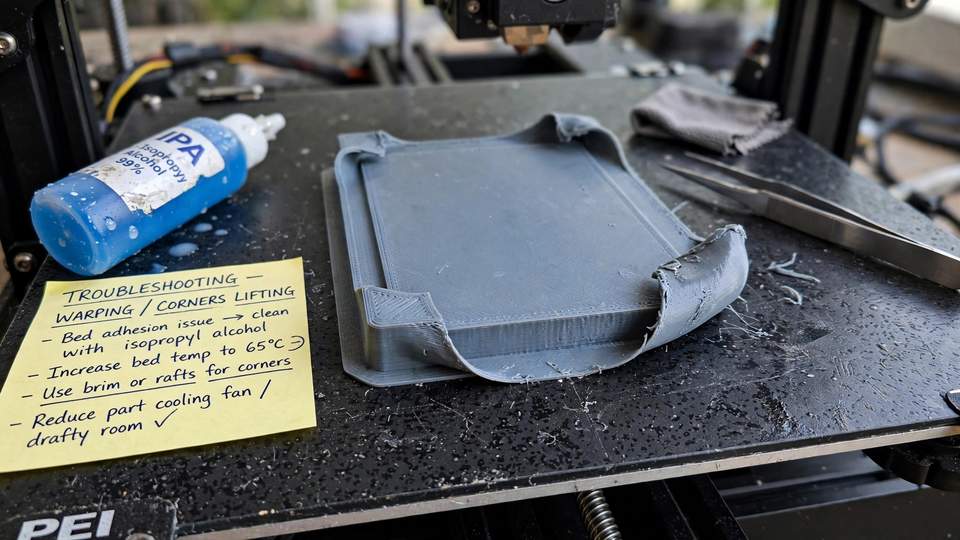
Bed adhesion is the only thing holding the print down against that pulling force. Warping is what happens when shrinkage wins — which is why it almost always starts at sharp corners, where stress concentrates. High-shrinkage materials like ABS, ASA and nylon warp far more readily than PLA, which has one of the lowest shrinkage rates of any common filament.
Why Australian Weather Makes Warping Worse
Warping is a thermal problem, so why does humidity matter? Because most filaments are hygroscopic — they absorb moisture straight out of the air, and humid Australian air delivers plenty.
Wet filament causes a cascade of problems that all feed warping: moisture turns to steam at the nozzle, causing popping and tiny voids that wreck layer adhesion; it extrudes unevenly so the first layer bonds unreliably; and the stringing it produces masks the real problem while you chase slicer settings that were never the issue.
It bites hardest in Brisbane, Sydney, Darwin and anywhere tropical through summer — a spool of PETG left on an open printer for a week in February can absorb enough moisture to turn a perfect profile into a warped mess. In drier cities the problem shifts to winter draughts cooling the part unevenly. Either way, the first question for Australians chasing a 3d print warping fix should be: when did you last dry this spool?
Diagnose Before You Fix
Read the failure before changing anything. Only the corners lifted means classic shrinkage warping — start with bed adhesion and a brim. The whole print detached means the first layer never bonded — check bed cleanliness, levelling and Z-offset first. Warping hours in points to draughts or ambient cooling. A spool that used to print fine points to moisture — dry it before touching any setting. Only one material warps means temperature tuning for that material. Work the fixes below in order; most cases die in the first three or four.
3D Print Warping Fix #1: Start With a Clean Bed
This is the fix that costs nothing and gets skipped the most. Fingerprints, dust, and residue from previous prints all reduce adhesion, and a bed that’s “clean enough” often isn’t.
Wash a removable plate in warm water with a drop of dish soap, rinse and dry completely. For a fixed bed, wipe thoroughly with isopropyl alcohol (90%+) and a lint-free cloth — every few prints as a habit, since greasy fingerprints are a classic cause of “stuck everywhere except one spot” failures.
If you’re still on the original surface of an older printer, consider the upgrade most of the community has made: a textured PEI spring-steel sheet. PLA, PETG and TPU stick beautifully with no adhesive and release with a flex of the plate once cool. For ABS and ASA, a thin smear of glue stick on the PEI still earns its place.
3D Print Warping Fix #2: Brims, Rafts and Mouse Ears
The cheapest way to beat shrinkage leverage is to give the bed more plastic to grip — and that’s a slicer setting away.
- Brim (start here): a single-layer outline extending outward from the base of your print. Use 8–15 mm for warping-prone materials. It massively increases contact area with almost no extra print time, and trims off in seconds. For PLA parts with sharp corners, a brim alone fixes warping nine times out of ten.
- Mouse ears (for stubborn corners): small discs placed under just the corners. OrcaSlicer can add them automatically — all the holding power of a brim, but only where the stress is.
- Raft (last resort): a sacrificial grid under the whole part. Uses more filament and leaves a rougher bottom surface, but can save very warp-prone prints on an open printer.
Set the brim-to-model gap to zero so the brim actually connects to the part. A brim with a gap is just a decorative outline.
3D Print Warping Fix #3: Tune Your Bed Temperature
The heated bed keeps the bottom layers warm so they don’t contract while the rest of the print goes down. Too cool for the material and the bottom layers shrink and let go; too hot and you get elephant’s foot. The sweet spots:
- PLA: 55–65 °C (60 °C is the standard starting point)
- PETG: 70–85 °C
- TPU: 40–60 °C (often fine with the bed off, but a little heat helps)
- ABS / ASA: 90–110 °C — and honestly, an enclosure matters more than the exact number
- Nylon: 80–100 °C, and dry filament is non-negotiable
Tune in 5-degree steps on a simple test — a flat 100 × 20 mm bar with sharp corners is the classic warping torture test — until the corners stay down. Don’t guess across materials: what holds PLA won’t hold ABS. One more trick: many slicers let you run a hotter bed for the first layer that drops after layer five, bonding aggressively then releasing more easily when the print finishes.
3D Print Warping Fix #4: Nail the First Layer
The first layer is the foundation of everything. If it’s wrong, no brim or bed temperature will save you.
A good first layer looks like slightly squished, evenly laid lines with no gaps. Lines that are round and separate mean the nozzle is too far — lower your Z-offset a touch. A translucent-thin layer, or the nozzle visibly dragging, means you’re too close.
Most modern printers — including the Creality machine in our Ender 3 V3 SE setup guide — handle the heavy lifting with automatic bed levelling. Run it any time you change the build surface, move the printer, or notice inconsistency. It compensates for a tilted bed, not a wrong Z-offset, so always verify the first layer visually after any change.
Slow the first layer to 15–25 mm/s so the plastic has time to bond, and turn the part-cooling fan off for the first 2–3 layers, ramping up gradually after. Blasting a fresh first layer with cold air is practically an invitation to warp.
3D Print Warping Fix #5: Dry Your Filament (The Australian Essential)
If you take one thing from this guide, make it this: in Australia’s climate, a filament dryer isn’t a luxury — it’s core equipment. A spool of PETG left out for a fortnight in a humid house can go from printing beautifully to stringing and warping, and no slicer tweak fixes wet plastic.
Dedicated dryers heat the spool to a controlled temperature for several hours while sealed from room air, and many let you feed filament straight into the printer. As a general guide: PLA: 45–50 °C for 4–6 hours · PETG: 60–65 °C for 4–6 hours · ABS/ASA: 65–80 °C for ~4 hours · TPU: 50–55 °C for 4–8 hours · Nylon: 70–80 °C for 8–12 hours.
A food dehydrator set to the right temperature works well too. Skip the kitchen oven — most can’t hold low temperatures accurately, and it’s easy to fuse a spool solid.
Drying fixes the problem; storage prevents it coming back. Keep opened spools in airtight boxes or vacuum bags with silica gel desiccant, plus a cheap hygrometer so you can see when the desiccant needs recharging — under 40% RH for everyday filaments, under 20% for nylon and TPU. A basic single-spool dryer from an AU retailer typically runs A$60–A$120 (check current prices), which pays for itself the first time it rescues a $40 spool of PETG. For more on drying methods, this filament drying guide covers the temperatures and techniques in detail.
3D Print Warping Fix #6: Kill the Draughts
Uneven cooling is warping’s best friend. A printer next to an open window, under an air-con vent, or in a winter draught cools one side of the part faster than the other — and that differential lifts corners. Move the printer away from windows, doors and direct airflow. For PLA and PETG a full enclosure is usually unnecessary — but draught protection still helps on long prints.
For ABS, ASA and nylon, the real answer is an enclosure: keeping the air around the print at 35–45 °C slows cooling dramatically and nearly eliminates warping. Many makers start with an IKEA LACK table stack or a large cardboard box over the printer (kept well clear of the hot end and power supply).
Part Cooling and Speed: The Supporting Cast
These tweaks won’t fix warping alone, but they stack with everything above — reduce the part-cooling fan for warp-prone materials (ABS and ASA generally print with the fan off or very low), keep speeds modest for the first 5–10 layers, and remember that chamber temperature beats fan curves for ABS/ASA every time.
The Step-by-Step 3D Print Warping Fix Checklist
When a print warps, work through this list in order — most cases resolve in the first four steps:
- Clean the bed. Soap and water or isopropyl alcohol. Do this first, every time.
- Dry the filament. If the spool has been open more than a week or two — especially PETG, TPU or nylon — dry it before changing anything else.
- Re-level and check the first layer. Run auto-levelling, verify Z-offset visually on a test print.
- Add a brim. 8–15 mm wide, zero gap to the model.
- Tune bed temperature from the ranges above, in 5-degree steps.
- Slow the first layer and turn the fan off for layers 1–3.
- Eliminate draughts. Move the printer, close the room.
- Enclose for ABS/ASA/nylon. If you print these regularly, an enclosure isn’t optional.
- Consider the material. If a part doesn’t need ABS’s heat resistance, reprint it in PETG or PLA and watch the problem vanish. Our PLA vs PETG vs ABS comparison breaks down which material suits which job.
When It Isn’t Really Warping
Two lookalikes are worth ruling out. Poor adhesion from a worn build surface mimics warping — if filament that used to stick suddenly won’t, the PEI coating may simply be worn out. And if a print lifts with a loud crack hours in, suspect layer separation (delamination) instead: same family, but the fix leans harder on nozzle temperature and enclosure than on bed adhesion.
Frequently Asked Questions
Why does my 3D print warp only in summer?
Summer in most of Australia means high humidity, and humid air loads filament with moisture. Wet filament bonds poorly to the bed and between layers, so prints that were fine in winter start lifting. Dry the spool and store it sealed with desiccant, and the seasonal warping usually disappears.
What is the best bed temperature to stop PLA warping?
60 °C is the reliable starting point. If corners still lift, nudge up to 65 °C in small steps. Much hotter causes elephant’s foot without adding much extra grip.
Does a brim really stop warping?
Yes — it’s one of the most effective single changes you can make. An 8–15 mm brim with zero gap to the model gives shrinkage forces far more grip to fight against. Combined with a clean bed and correct first layer, it resolves most PLA and PETG warping cases.
Can I print ABS without an enclosure in Australia?
Small ABS parts can sometimes survive on an open printer with a brim, a 100 °C+ bed and zero draughts — but anything large or flat will almost certainly warp. For regular ABS or ASA printing, an enclosure holding 35–45 °C is the fix that actually works.
How do I know if my filament is wet?
Listen for popping or hissing at the nozzle, and look for stringing, rough or bubbly surfaces, and weak layer bonds on a spool that used to print cleanly. When in doubt, dry it — a few hours in a dryer harms nothing.
Will a PEI sheet stop warping completely?
Textured PEI dramatically improves adhesion for PLA, PETG and TPU and solves most warping on its own. But it can’t repeal physics — large ABS parts on an open printer in a cold room can still lift. Treat it as the foundation that makes every other fix work better.